
Should I Use LightKey? FULL LightKey App Review
Nov 01, 2022LightKey is a program I’ve been watching for a while now and it often refers itself as lighting control Mac style.
In this post, we are going to take a close look at LightKey. I’m going to share a full and honest review of the system, the good and the bad. My goal is to show you how to get started with LightKey so that you can decide if it is right for you because the lighting console will be the heart of your set up.
Launching Lightkey
When launching Lightkey you will be brought to the splash screen. This is the screen that you will be brought to regardless if you are purchasing it or trying the demo version.
With any program, I would highly recommend checking out the demo version to see if you would like it or not. You can check out the demo version here!
New Project
To start a new show or project you want to click “New Project” on the splash screen. Then you can title the project and click “Save”.
What I really like about Lightkey is that it is very simple to get started with. Once you start your new project you will be brought to a screen to set up the DMX Settings.
You will have the options for USB, Art-Net, sACN, or ESP. If you are using a basic ethernet control I do recommend using sACN. If you’re not sure which one to start with be sure to check out this article: How Do I Setup My First sACN or Art-Net Device?
Once you have decided on the output type you can just select it and set up your network.
Patching Fixtures
Next, you will be able to patch in your fixtures. Another thing I really like about Lightkey is the fixture library. Not only is the library great but it’s also very easy to add a fixture that is not listed in the library.
Using the search bar you can find your fixture but if it’s not listed you can have it added two separate ways. You can either request to have the fixture added through Lightkey’s website or you can simply bring in an SSL2 file and add it yourself.
After adding your fixture, just set up the patching information, and then add. You can even drag and drop your fixtures if you prefer. Once done just click “Next”.
Building Your Show
Once you have set up the fixtures you will be brought to the screen to start creating and designing your stage. The icons located on the left side of the screen are for you to design your stage. Just set up and organize the look.
The great thing about Lightkey is that there is a wizard on the top of the screen that will be able to walk you through the setup process. Once you are done designing your stage just click “Next”.
Creating Groups
On the top menu, you will have icons and to group your lights just click the “Groups Icon”.
One of the things I dislike about Lightkey is that you are only able to have one group that contains each light so lights aren’t able to be a part of multiple groups. Lightkey’s goal is to keep everything as simple as possible, and so I guess that accomplishes that end 🙁
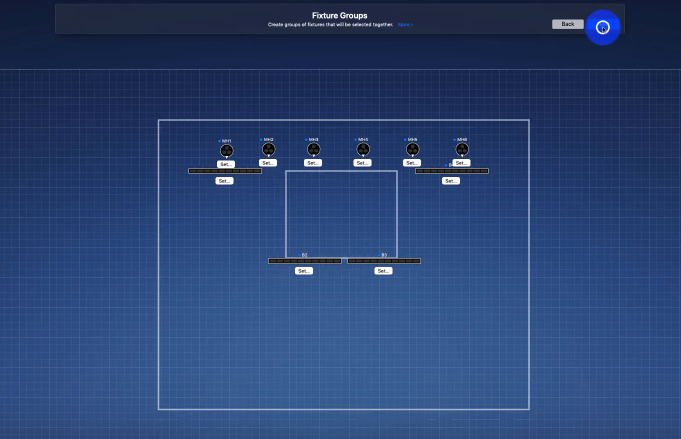
Once you set your groups you can then set up the beams, directions of the lights, etc.
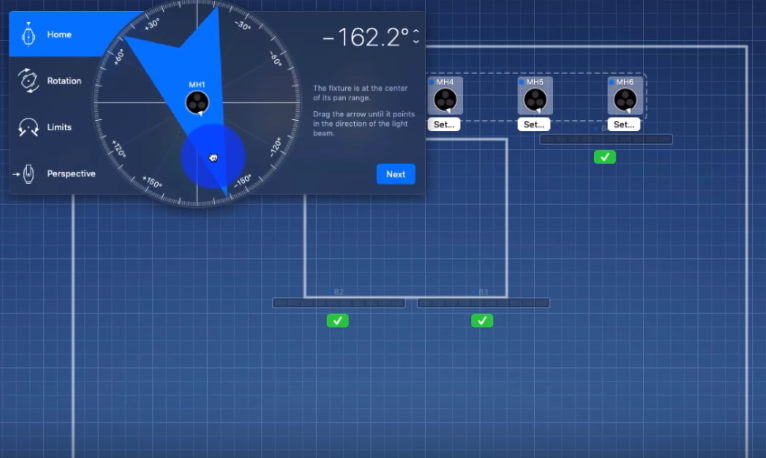
Lightkey has a very cool function for moving lights where you can set the direction, rotation limits, perspective, etc. Once you are done setting the lights just click “Next” on the top of the screen.
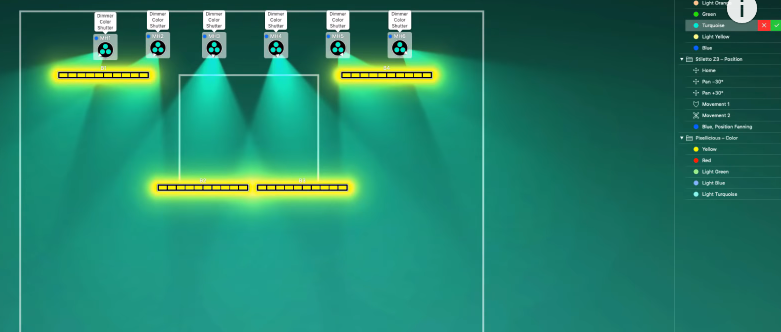
Building Presets and Cues
After setting the lights you then will be brought to a preview screen where you will be able to set the positions, color, tilt, and dimmer.
Next, you want to start building out your presets for the stage by setting up colors, dimmers, light positions, etc. These presets will be saved on the right-hand sidebar.
On the bottom panel, you will have a Design tab and a Live Tab.
The live tab is where your cues will be set up and saved. As you are setting up your presets you can simply drag and drop these into your Live tab (cues) area. The presets are very easy to adjust and change if need be and you can build as many cues as you want.
Setting up Effects
In this “preview” mode you will also be able to set up your effects. To do this you will see a wand icon located on the top right of your screen.
When you click the “Wand” a custom effects area will appear on the bottom of your screen. There will already be some custom effects pre-built for you or you can create a new one.
Once you have set up your effects you can click “Save” and it will pop up in your Presets located on the right-hand sidebar.
My Thoughts on Lightkey
Lightkey’s goal is to keep things simple so this makes it very easy to learn and manage.
I do feel that Lightkey is more ideal for those that do live events such as churches, corporate events and such. I don’t believe this would be a good program for those in the theater world.
Lightkey is a very good option to consider for those who just want to keep their setups and shows simple.
What I Don’t Like
There a few features that I don’t really like about Lightkey. One of them is the grouping the lights feature. As I mentioned earlier a light can only be assigned to one group so this can make it tricky when setting up cues and presets.
Another issue I see some people having is the preset area on the sidebar. This area can get built up very easily and quickly can build up as you add colors, positions, and effects. This can cause confusion as you try to look for certain presets during our show.
Pricing and Info
Depending on how many channels you are needing you can choose the different pricing plans to fit your needs. You can check out the pricing here.
If you don’t have an output device you will definitely need one. Lightkey does provide information on the supported interfaces, such as ENTTEC USB interfaces and networked DMX nodes.
MIDI Controllers are also very nice to have when working with Lightkey. Lightkey does also provide an easy-to-use interface for MIDI, and also provides MIDI feedback to controllers that light up.
When Lightkey first came out I wasn’t a huge fan of it but since it’s made changes and seeing how far it has come I like to recommend it for Mac users. Personally, I really like their vision and the ease of using the program to work with stage lighting. Check out LightKey here!
HOW TO BEGIN WITH LIGHTING
Getting started with lighting is difficult. What tools do you need?
How do you know if what you're buying or using is the right solution?
Let me send you a FREE guide to help you begin with lighting:

